Converting Groups to Layers
Groups can be saved to the following file formats:
§ TerraExplorer FLY project
§ Esri shapefile
§ OGC KML/KMZ file
To save a group as a layer:
1. In the Project Tree, right-click the required group and select Save As Layer(s) from the shortcut menu. The Save As dialog opens.
2. Browse to the required directory in which you want to save the layer file, and type a file name.
3. Click Save.
Note: If you select this option from a group, you recursively save this group and all its sub-groups. If you select this option from the root, you save all the groups in the Project Tree.
4. If saving a group as a shapefile, the Export dialog is displayed. Enter the required parameters and click Export. See “Export to Shapefile Dialog” in this chapter for information.
Export to Shapefile Dialog
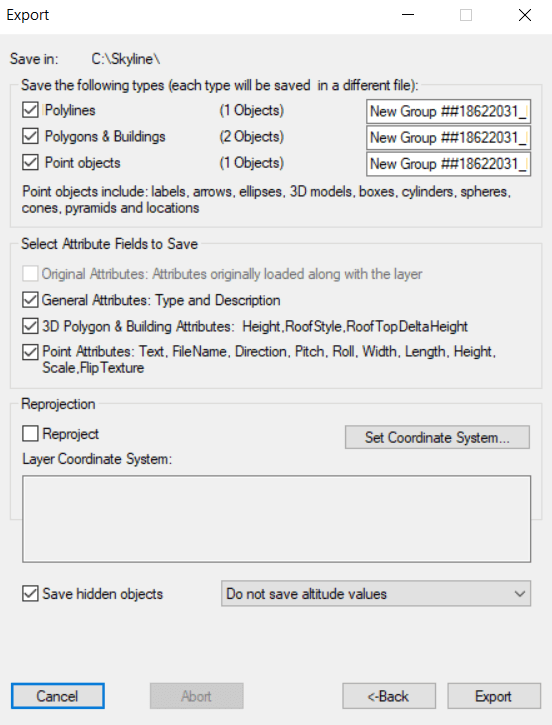
Export Dialog
To use the Export to Shapefile dialog:
1. Enter the required parameters:
|
Parameter |
Description |
|
Save in |
Displays the path of the shapefile(s) to be saved. |
|
Geometry Types |
The elements are divided into three types: § Polylines (including arcs) § Polygons (including circles, rectangles, regular polygons and 3D polygons) and buildings. § Points objects: text and image labels, 2D and 3D arrows, ellipses, 3D models, boxes, cylinders, spheres, cones, pyramids and locations. Select the check box next each one of the types you want to save. Note: Even if you save more than one group, all elements of the same type are saved in one shapefile. |
|
Select Attribute Fields to Save Add attributes fields information to the shapefile (*.dbf file). |
|
|
Original attributes |
Save any attribute fields that were originally loaded with the layer. |
|
General Attributes: |
§ TE_TYPE: The type of the element (Rectangle, Circle, Label, etc.) § TE_DESC: The description in the Project Tree |
|
3D Polygon & Building Attributes |
§ TE_HEIGHT: The height of the 3D Polygon. § TE_ROOF_ST: The style of the roof. 0 for flat, 1 for angular. § TE_ROOF_DE: The delta height between rooftop and roof base. |
|
Point Attributes |
§ TE_TEXT: The text of a text label. § TE_FNAME: The name of an image label file or a 3D model file. § TE_YAW: The direction of the element. § TE_PITCH: The pitch of the element. § TE_ROLL: The roll of the element. § TE_WIDTH: The width of the element. § TE_LENGTH: The length of the element. § TE_HEIGHT: The height of the element. § TE_SCALE: The scale of the object, if applicable. § TE_FRAME: The name of the image label frame file. |
|
Reprojection |
|
|
Reproject |
Select the Reproject check box to save the shapefile with a coordinate system different from the coordinate system of the terrain. Click the Set Coordinate System button to open the Coordinate System dialog and specify the coordinate system of the layer. See “Coordinate System Dialog” in the “Basic Concepts” chapter for information. |
|
Save Hidden Objects |
Select the check box to save all the elements, hidden or not. |
|
Saving the Elements Altitude |
Select from one of the following options: § Save altitude values relative to terrain: Save the elements in a 3D shapefile, altitude values are relative to terrain. § Save altitude values absolute: Save the elements in a 3D shapefile, altitude values are absolute. § Do not save altitude values: Save the elements in a 2D shapefile. |
2. Click Export.